PBD Rope Simulation in Godot
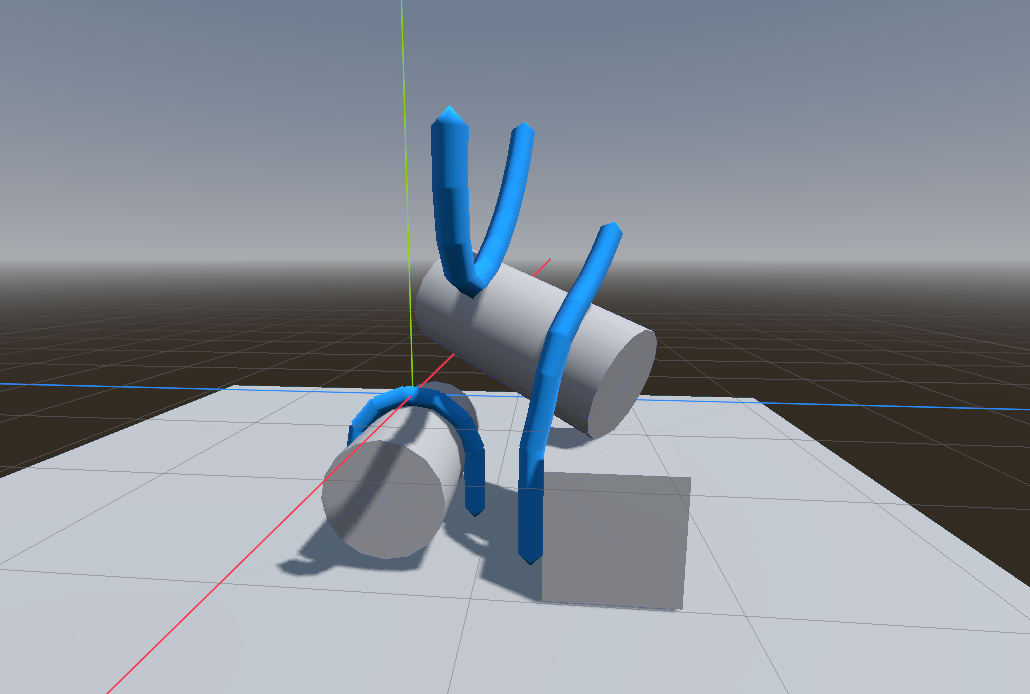
Over the past year or so, I’ve been working on a prototype for a game where ropes happen to play an important thematic role. It needs to cook for a while longer before there’s any official announcement, but I’d like to share some of my recent work developing a rope simulation for the game in the Godot engine.
The Algorithm
For the initial implementation, I went with Position Based Dynamics (PBD), for a few reasons:
- It’s fast (like, really fast)
- It’s stable
- It’s simple to implement
Here’s the algorithm in its entirety:
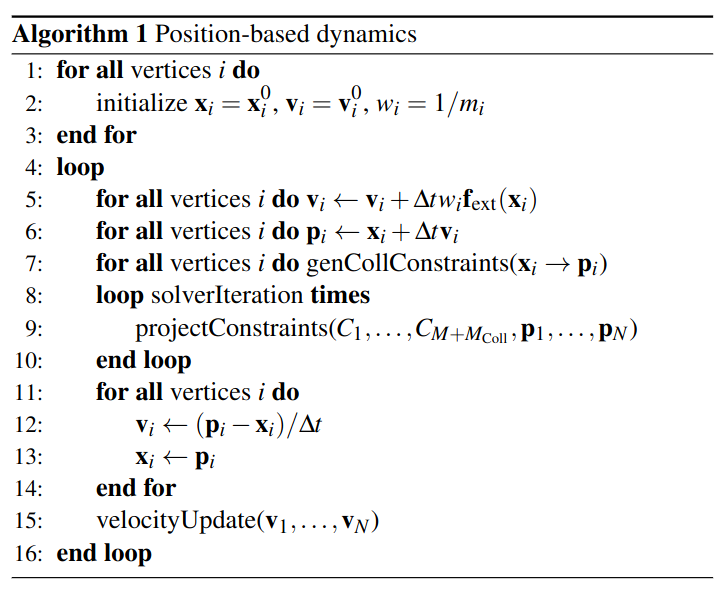
I won’t go into much detail about how this algorithm is derived or the math behind it, but if readers are interested, I recommend checking out the original paper, or this lovely blog post by Carmen Cincotti which helped me to better understand how it all works. In short, we iteratively correct the positions of the particles in order to fulfill distance constraints between them, and we reconstruct velocity each frame from the difference in positions between the current and previous frame, much like standard Verlet integration.
PBD is general enough that with small extensions, it can be used to simulate fluid dynamics, cloth, and even rigid bodies, though the rope simulation will just be treated as a simple particle system with distance constraints between each particle along the rope’s length.
There are some well-known drawbacks with standard PBD, such as the fact that the stiffness of the simulation is dependent on the number of solver iterations, as well as the time step used. In addition, PBD doesn’t provide any estimates for the forces acting on the particles, making two-way attachments more difficult to model.
In the next (and hopefully final) implementation, I’ll address those issues by switching to a variation of PBD that I’ll refer to as Substep XPBD. XPBD (eXtended Position Based Dynamics) introduces the concept of a total Lagrange multiplier, which allows the constraints to be solved in a way that is independent of time step and iteration count as well as giving force estimates for each particle, while the change from iterations to substeps will speed up the convergence rate of the simulation.1
Implementation
For simplicity, I’ll give shortened and simplified code examples in GDScript throughout the post to avoid getting bogged down explaining every single implementation detail, but the full unedited code is available at the bottom of the page for those that are interested.
For now, we’ll need to create a new script for the rope node, and give it some properties to store the particle data.
class_name PBDRope3D_GD extends MultiMeshInstance3D

var positions: PackedVector3Array
var predicted: PackedVector3Array
var velocities: PackedVector3Array
var inverse_masses: PackedFloat32Array
var damping_factors: PackedFloat32Array
Then we need to initialize the particle data, and this will have to be done every time the rope has to be rebuilt (i.e. if the number of segments changes).
func rebuild() -> void:
    var particle_count := segment_count + 1
    positions.resize(particle_count)
    predicted.resize(particle_count)
    velocities.resize(particle_count)
    inverse_masses.resize(particle_count)
    damping_factors.resize(particle_count)

    var rng := RandomNumberGenerator.new()
    for i in range(particle_count):
        var pos := global_position + Vector3(rng.randf(), rng.randf(), rng.randf()) * 0.001
        positions[i] = pos
        predicted[i] = pos
        velocities[i] = Vector3.ZERO
        damping_factors[i] = 1.0

    regenerate_particle_masses()
    rebuild_mesh()
    update_mesh()
    dirty = false
This includes calculating each particle’s mass, which is stored as inverse mass for efficiency reasons. For simplicity, the user defines a single mass value for all particles, and then anchored particles are given an inverse mass of 0 (infinite mass). This makes sure that constraint projection doesn’t attempt to move anchored particles.
func regenerate_particle_masses() -> void:
    var particle_inv_mass = 1.0 / particle_mass
    inverse_masses[0] = 0.0 if anchor_start else particle_inv_mass
    inverse_masses[1] = 0.0 if use_rotation else particle_inv_mass
    for i in range(2, segment_count + 1):
        inverse_masses[i] = particle_inv_mass

    ... # Update anchored particles' inverse mass to 0

    masses_dirty = false
Next we need to decide how to drive the simulation loop. I decided to just step the simulation once per _physics_process since it’ll be called with a consistent framerate regardless of what we choose for the fixed simulation timestep.
func _physics_process(delta: float) -> void:
    if simulation_paused:
        return

    ... # Other early returns i.e. if not selected in editor

    if dirty:
        rebuild()
    if masses_dirty:
        regenerate_particle_masses()

    update_simulation()
    update_mesh()
    elapsed += delta
And finally this brings us to the actual simulation code. The update_simulation method itself is basically just a direct translation of the pseudocode from the algorithm above, but with a few modifications for force accumulation, anchors, and different collision modes.
func update_simulation() -> void:
    var particle_count := segment_count + 1

    # Apply forces and predict next positions
    for i in range(particle_count):
        if inverse_masses[i] == 0.0:
            continue
        var velocity := velocities[i]
        velocity += gravity_acceleration * simulation_delta
        if wind:
            velocity += wind.sample(positions[i], elapsed) * inverse_masses[i] * simulation_delta
        velocity *= damping_factors[i]
        velocities[i] = velocity
        damping_factors[i] = 1.0
        predicted[i] = positions[i] + velocity * simulation_delta

    ... # Update anchored particle positions

    # Project constraints and resolve collisions
    match collision_mode:
        CollisionMode.NONE:
            for iter in range(solver_iterations):
                for i in range(segment_count):
                    project_segment(i, i + 1)
        CollisionMode.FAST:
            for iter in range(solver_iterations):
                for i in range(segment_count):
                    project_segment(i, i + 1)
            for i in range(particle_count):
                solve_collisions(i)
        CollisionMode.ACCURATE:
            for iter in range(solver_iterations):
                for i in range(segment_count):
                    project_segment(i, i + 1)
                    solve_collisions(i)
                solve_collisions(segment_count)

    # Update velocities and commit positions
    for i in range(particle_count):
        velocities[i] = (predicted[i] - positions[i]) / simulation_delta
        positions[i] = predicted[i]
Visuals
Now that the rope is simulating, we need to render it. There is a well-known style of rope rendering that uses Catmull-Rom splines to generate a flat, camera-aligned mesh every frame that uses very little geometry while handling curved edges nicely, but for this project’s purposes, we want an actual 3D mesh that isn’t view-dependant. For this reason, we decided to go with a simple capsule mesh at the center of each segment.
Since each segment will share the same geometry, and we need to render a bunch of segments at different locations, this is a situation where instanced rendering really shines. When we rebuild the rope, we can just set the number of instances in the MultiMeshInstance3D’s MultiMesh to be the number of segments in the rope, and once per frame (or whenever the rope actually updates), we can walk through all the segments and set the position of the corresponding mesh instance to the center of the segment.
func rebuild_mesh() -> void:
    multimesh.instance_count = segment_count
    multimesh.visible_instance_count = segment_count

    if segment_mesh_override:
        multimesh.mesh = segment_mesh_override
    else:
        var capsule := CapsuleMesh.new()
        capsule.radius = radius
        capsule.height = segment_rest_length + 2 * radius + segment_overlap
        capsule.radial_segments = radial_segments
        capsule.rings = segment_cap_rings
        multimesh.mesh = capsule

    mesh_dirty = false

func update_mesh() -> void:
    if mesh_dirty:
        rebuild_mesh()

    var inv_global := global_transform.affine_inverse()

    for i in range(segment_count):
        var p0 := positions[i]
        var p1 := positions[i + 1]
        var pos := (p0 + p1) * 0.5
        var segment := p1 - p0
        var current_length := segment.length()
        if current_length <= 0.001:
            continue

        ... # Calculate orientation

        multimesh.set_instance_transform(i, inv_global * t)
Calculating the position for each segment is trivial, but obtaining a stable orientation is a little more tricky. We want each capsule to be aligned so that the rope particles on either side of the segment are at the center of the base of each cap of the capsule. The problem is that there are infinitely many orientations that fulfill this requirement. In other words, once a segment is positioned in a valid orientation, you can twist it any amount and the orientation is still considered valid.
Initially, I tried constructing orientations independently for each segment by choosing an arbitrary “up” direction and using the shortest arc rotation quaternion from the chosen up direction to the segment direction to construct a basis.
var orientation := Quaternion(Vector3.UP, segment)
var t := Transform3D(Basis(orientation), pos)
While this method appears to work well in many situations, it necessarily introduces unwanted twisting when the segment direction approaches the opposite of the chosen up direction. This is because there are infinitely many “shortest” arcs from any direction to its opposite.
An interesting thought experiment to build intuition for why this happens is to imagine somebody asked you what the shortest path is from the south pole to the north pole. Assuming the earth is a perfect sphere with no hills or valleys, allowing you to walk along the earth’s surface from one pole to the other without changing direction, no matter which direction you begin walking in, by the time you reach the other pole, the distance travelled would be the exact same.2
A common workaround for this twisting issue is to choose a different up direction based on the alignment of the segment.
var reference_dir := Vector3.UP if segment.y > 0.0 else Vector3.DOWN
var orientation := Quaternion(reference_dir, segment)
var t := Transform3D(Basis(orientation), pos)
This does make the orientations stable when facing up or down, but introduces a flip when segments cross the horizontal boundary. For a rotationally symmetric shape, the flipping might not be noticeable, but since we need to be able to attach arbitrary objects to the rope, having the attachment transform flip when the rope moves is unacceptable for our case.
The solution that I ended up going with is to construct a discrete Rotation Minimizing Frame (AKA Bishop Frame), using parallel transport. The main idea is to take the orientation of the first segment and transport it sequentially down the rope, minimizing the rotation between each pair of adjacent segments. Since the first segment doesn’t have a previous segment to transport from, it can simply use its orientation from the previous simulation step.
For this to work, technically you only need to store the first segment’s orientation, but I decided to store the orientation per segment so that attachments can more efficiently query transforms along the rope without having to transport the root orientation down to the attachment location every time.3
var v := segment_orientations[0]
var orientation := Quaternion(v.x, v.y, v.z, v.w)
for i in range(segment_count):
    ...

    var tangent := segment / current_length
    var prev_tangent := orientation * Vector3.DOWN
    var q_rot := Quaternion(prev_tangent, tangent)
    orientation = (q_rot * orientation).normalized()
    segment_orientations[i] = Vector4(orientation.x, orientation.y, orientation.z, orientation.w)

    ...
This method of constructing orientations fixes both the flipping and twisting issues, and always settles into a stable configuration regardless of orientation.4
Another visual issue has to do with stiffness. When the rope’s stiffness is set to below 1.0 to make it stretch, its segments become visually separated, which is undesirable. As well, because PBD is an iterative solver, it may not converge to a stiff result immediately even with a stiffness of 1.0, meaning this separation can even happen with fully stiff ropes.
Thankfully, it’s very simple to account for this by simply adding a scaling factor to stretch each segment’s mesh instance proportional to the ratio between the current segment length and the resting segment length.
var factor := Vector3(1, current_length / segment_rest_length, 1)
var t := Transform3D(Basis(orientation), pos).scaled_local(factor)
Finally, we may want ropes that look like something other than a low-poly elongated capsule, so I added properties to adjust the resolution of the generated capsule geometry, as well as a mesh override resource that will be used instead of the generated capsule when supplied.
Collision
Now that the rope is rendering properly, it would be nice if it could collide with the environment! So far I’ve implemented 2 types of collision: raycast and sphere. Each of these can either be done once per frame after all solver iterations have finished (“Fast” mode), or in-step with distance constraint projection, repeated for each solver iteration (“Accurate” mode).
The raycast collision type simply shoots a ray through each particle in the direction of that particle’s motion, and corrects the predicted position if an intersection occurs. It’s very resistant to velocity-based tunnelling, but it allows a significant amount of surface penetration, and cannot be pushed by moving geometry since it only detects collisions in the direction of motion.
The sphere collision type does essentially the same thing, except it sweeps a full sphere representing each particle, rather than just a ray through the center. Sphere collisions remove the surface penetration slop from the raycasting method and allow the rope to be pushed by geometry moving under a certain speed, but are less resistant to velocity-based tunnelling against small or oddly-shaped objects, and are significantly slower to compute.
The collisions work well, but one thing is still missing: friction. To avoid the ropes sliding along the ground forever like the world has frozen over, I also added a property called contact_damping, which is the proportion of velocity a particle should lose over 1 second of the simulation while contacting a surface. It’s only a cheap approximation of real friction, but it has the desired effect and is intuitively tunable by designers.
Attachments / Anchors
What we have so far is a stable and performant rope simulation, but it isn’t very useful for gameplay purposes yet, since all it can do is collide with solid geometry to affect its own movement. Currently, ropes aren’t able to affect or be detected by other objects in the scene. We could add some sort of collision tracking to the rope based on the contacts seen during the simulation and send out signals manually, but for all the different types of interactions a designer might want to model, I feel that trying to shoehorn all of that functionality into the rope itself is a bad idea.
Instead, I think a cleaner solution is to add this functionality as needed via a robust attachment system. For one-way attachments this is very simple, and I went with a structure similar to how BoneAttachment3D nodes work with Skeleton3D. You can simply add a RopeAttachment3D as a child of a rope node and adjust its t property to position the attachment along the rope, optionally snapping to particles or the center of segments.
With these one-way attachments, we can easily add more functionality to the ropes. For instance, if you want to detect when something is hit by the rope, you could attach Area3D nodes along the rope to use as hitboxes. A benefit of this approach is that you don’t have to pay the computational cost of testing intersections for every single segment, since you could easily use large capsules or spheres to approximate large sections of the rope:
The same could be done with an AnimatableBody3D to be able to push other rigid bodies in the scene as well:
For attachments in the other direction, you can change the RopeAttachment3D’s mode to Mode.ANCHOR, which will invert the relationship. In anchor mode, when snapping to the nearest particle, the attachment will write its global position to the closest particle during the simulation step. When snapping to segments or with snapping disabled, it will position the 2 closest particles segment_rest_length apart along its global Z axis, respecting the relative distance to each.
Two-way attachments (like being able to attach a rigid body to the rope in a physically plausible way) are more complicated, and I plan on tackling them in the next implementation once we gain the force estimates for each particle from implementing XPBD.
Performance
The GDScript implementation ended up performing much better than I expected, but unfortunately still a bit short of the goals of the project, so I grabbed a clone of godot-cpp and the godot-cpp-template and ported the rope class to C++ GDExtension.
As expected, even just a direct port resulted in huge performance gains, with ~13x speedup for ropes without collision, and ~3x speedup for ropes with raycast collisions on my test machine (a laptop with a core i5-1240p). Looming over these numbers however, is a problem that has been plaguing Godot for many years: its physics querying API.
For those unaware, Godot’s physics querying API currently has a serious design flaw. The internal query methods are implemented well and are reasonably fast, but a few of the public-facing methods take their quickly gained result, create a dictionary, and re-store the result parameters into the dictionary before returning it. Not all of the query methods use a dictionary, but all of them do perform unnecessary allocations just for the return value which adversely affects performance. The current API was only meant to be a quick hack until a better solution was found, but as of now, no proposed solution has been accepted.
That should be the end of the bad news though, because there is now a PR which fixes the entire API by adding non-allocating, strongly typed versions of each query method alongside the existing implementation.5 Each new method takes a RefCounted result container as an argument and stores its results into the pre-allocated object only if the query is successful (conveniently detected by the boolean return value from each new method).
This makes it possible to create a result object once and reuse it for all queries, completely eliminating the per-query allocations that are currently required. Since the new result objects are real types, this also makes the new API type-safe and thus clearer and faster than the existing dictionary-based API which required explicit type annotations and string lookups to access each property of a given result.
Using the new typed ray intersection method, the C++ ropes using raycast collisions saw an additional ~250% speedup for the entire simulation step, not even just the collision resolution phase. This means it more than doubled the amount of ropes that can be simulated in a given frame budget just from switching a single method call.
In practice, this means that the same i5 laptop from before can now simulate 11,000 particles (1,000 ropes * 11 particles each) at a stable 60fps with raycast collisions enabled, even in the editor. With the current dictionary-based API, the same test begins to drop below 60fps anywhere past 3,000 particles, and turns into a slideshow well before 4,000.
Discussion is still ongoing to settle on a naming scheme for the new methods and to evaluate any potential further improvements, but hopefully the improved API will be merged soon and becomes available in a future Godot release!
Conclusion
This post is already way longer than I was hoping, so I’ll have to stop here for now. Next time I’ll probably be talking about the final implementation of the rope simulation, or potentially something else.
I plan to release the final GDExtension C++ rope implementation as an addon for desktop platforms once it’s finished (and hopefully with that new physics API available). Until then, please feel free to play around with the GDScript implementation using the current API by downloading the code and pasting the addons/ folder into a Godot project. This implementation has been tested in Godot versions 4.5-stable, 4.6.3-stable, 4.7-stable, and the current 4.8 master branch as of writing.
References
- https://matthias-research.github.io/pages/publications/posBasedDyn.pdf
- https://mmacklin.com/2017-EG-CourseNotes.pdf
- https://carmencincotti.com/2022-08-01/the-pbd-simulation-loop/
- https://matthias-research.github.io/pages/publications/XPBD.pdf
- https://matthias-research.github.io/pages/publications/smallsteps.pdf
- https://www.microsoft.com/en-us/research/wp-content/uploads/2016/12/Computation-of-rotation-minimizing-frames.pdf
- https://en.wikipedia.org/wiki/Richard_L._Bishop
- https://en.wikipedia.org/wiki/Parallel_transport
- https://www.youtube.com/watch?v=BHdbsHFs2P0
-
XPBD itself does not increase the convergence rate of the simulation over PBD, but switching to multiple full substeps instead of just running the solver for multiple iterations inside of a single larger time step does speed up convergence. Even though substeps are more expensive when comparing
nsubsteps withniterations, we may actually gain performance overall since it should require less substeps than iterations to reach a similarly stiff result. ↩ -
3Blue1Brown has a great video that goes into much greater detail about this concept if you enjoy math videos as much as I do :) ↩
-
There is no
PackedQuaternionArraytype or constructors to convert betweenVector4andQuaterniondirectly so manual packing / unpacking toPackedVector4Arrayis required here. ↩ -
The twisting issue is technically still present, but only when 2 adjacent segments face in nearly opposite directions, which is a configuration that does not occur often, and rarely lasts longer than a few simulation steps when it does. ↩
-
For those wondering why the existing API isn’t simply replaced, it’s because that would require breaking changes that would make it more difficult for users to develop plugins or addons that work with multiple versions of the engine (among other issues). Leaving the existing API intact avoids making any breaking changes, while still allowing users of newer engine versions to use the improved API. ↩